

Fermentations-Basics: Rosa Sauerkraut
Everybody loves sauerkraut! No wonder – besides being full of gut-loving probiotics, fermentation is a great method to conserve all the vitamin C that is abundantly present in fresh cabbage. For our ancestors, who didn’t have access to fresh vegetables (or citrus fruits …) during the winter months, these kinds of pickles were storehouses of essential nutrients. Nowadays we have the luxury to find far-travelled or freshly harvested foods on the supermarket shelves and I too crave salads and fruit in the cold months. Nonetheless, fermenting vegetables is a great addition to our daily dishes and helps save energy and resources.

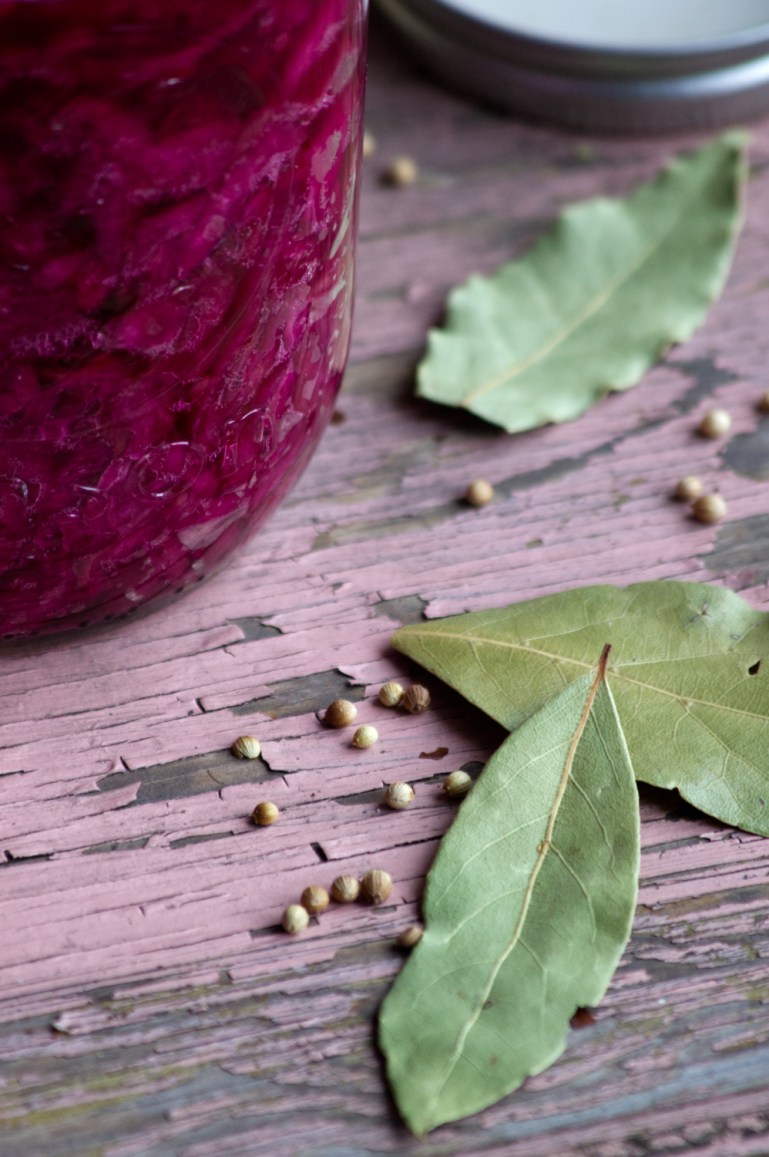
For this recipe I used half red and half white cabbage, the two of which will transform into a spectacular magenta hue when fermented together – a very welcome dash of colour on these grey days. Coriander and laurel leaves give the pickle a nice kick; if you are a traditionalist, you can swap the coriander for caraway seeds.


The recipe below can be used as a base recipe for other vegetable and spice combinations. Just make sure to use firm produce, as leavy greens don’t ferment well.
Happy fermenting!


Recipe: Pink Sauerkraut
Ingredients
- 1 medium-sized head red cabbage
- 1 medium-sized head white cabbage
- salt
- 2 Tbsp coriander seeds
- 8 laurel leaves
- clean mason jars with lids
- 1 cup salt water (1 cup of water + 1/2 tsp salt)
Directions
Remove the outer layers of the cabbages. Quarter each cabbage, remove the stems and cut the quarters into fine slices. If you own a mandolin slicer all the better! The thinner the pieces, the easier they will ferment. Layer the cabbage into a large bowl, alternating between red and white cabbage and salt. I go by feel and do it like this: I take as much cabbage as I can hold between my two hands, add to the bowl and toss with about half a teaspoon of salt, then add the next two handfuls and so on.
Let this mixture sit for about an hour. Then it’s time to get to work! Knead and massage the cabbage to break the cell walls and get the salt into the vegetable. The result will be large amounts auf cabbage-juice collecting at the bottom of the bowl – a vital ingredient for a successful ferment! The fresher the cabbage, the more juice you will have. Add your coriander seeds to the mixture.
Fill the mason jars with boiling water and rinse the lids with it. Discard the water (pasta water anyone?) and let dry for a while. Then fill the cabbage into the jars, pressing down firmly as to avoid any air pockets between the vegetables. I only use a handful of cabbage at a time, pressing down firmly. If you have, use a wooden tamper to really push everything down into the jar. Add a laurel leaf here and there, then add the next layer, until the jars are about 80% full. Add the cabbage juice from the bottom of the bowl to the jars, so the vegetable slices are completely submerged in liquid. If you don’t have enough juice to cover the cabbage, add salt water. There should be about 2 inches / 6 cm of head space left in your jars. Close the lids and let the kraut sit at room temperature for about 2 weeks.
In the beginning I check them daily to make sure all the solids are submerged in liquid. Burp the jars every couple of days by opening the lid just a little bit to let the gas inside evade. This is an important step! If too much pressure builds up in the jars they might explode! You can take this as an occasion to smell your ferments: They should always smell pleasantly sour. Depending on room temperature, the sauerkraut will be done within 2-3 weeks. You can do a taste test using clean utensils to see if desired sourness is achieved! I like my kraut not too sour, so I transfer it to the fridge after about 2 weeks and leave it there to ferment slowly for another two weeks.
Always use clean utensils and wipe the rims and lids if pieces of kraut collect there. This way your sauerkraut will keep for a long time. As long as there’s no mold growing, there is really no strict point of spoilage – it depends on your taste! Even in the fridge the kraut will keep fermenting slowly. If sourness and fermentation advance to the limits of your palate, make sure to finish the jar in time!
Scroll down to the very end of this post to comment, share and like! I’d love to hear from you!
Did you like this post? Consider supporting me on Patreon!
Become a Patron!

Rosa Sauerkraut
Alle lieben Sauerkraut! Kein Wunder, denn abgesehen von seiner probiotischen Wirkung ist Fermentieren eine gute Methode, die Fülle an Vitamin C in frischem Kraut zu konservieren. Für unsere Vorfahren, die in den Wintermonaten kaum Zugang zu frischem Gemüse, geschweige denn zu Zitrusfrüchten hatten, waren diese Pickles überlebensnotwendig. Wir haben weitestgehend den Luxus, uns auf weit gereiste bzw. frisch angebaute Ware im Supermarkt zu verlassen und auch ich möchte meinen Wintersalat nicht missen. Das Konservieren von Gemüse ist aber eine köstliche Ergänzung in unserem täglichen Speiseplan und hilft Energie und Ressourcen zu sparen.
Für dieses Rezept verwende ich zu je einer Hälfte Rot- und Weißkraut, denn das macht eine spektakuläre Farbe, die jedes Gericht an diesen grauen Tagen aufpeppt. Koriander und Lorbeerblätter geben dem Gemüse einen würzigen Kick; wer’s lieber klassisch mag nimmt anstatt der Koriandersamen Kümmel.
Das untenstehende Rezept kann als Basis-Rezept für viele weitere eingelegte Gemüse- und Gewürzkombinationen verwendet werden. Wichtig ist nur, relativ feste Sorten zu verwenden, denn Blattgemüse zerfällt beim Fermentieren und schmeckt dann nicht wirklich.
Fröhliches Fermentieren!
Rezept: Rosa Sauerkraut
Zutaten
- 1 mittelgroßer Kopf Weißkraut
- 1 mittelgroßer Kopf Rotkraut
- Salz
- 2 EL Koriandersamen
- 8 Lorbeerblätter
- Einmachgläser
- 1/4l Salzwasser (Wasser mit 1 TL Salz)
Zubereitung
Die äußeren Blätter der Krautköpfe entfernen. Jeden Kopf vierteln, den Strunk entfernen und jedes Viertel in feine Streifen schneiden. Das geht am allerbesten mit einem Krauthobel, den ich aber auch nicht besitze … einach so fein wie möglich schneiden, denn feineres Gemüse fermentiert leichter und schmeckt besser. Dann das geschnittene Kraut in eine Schüssel schichten: Alles, was zwischen zwei Hände passt in die Schüssel legen und ca. 1 gestrichenen Teelöffel Salz darüberstreuen, kurz durchmischen. So schichtweise verfahren, bis das Kraut aufgebraucht ist.
Die Mischung für ca. eine Stunde ziehen lassen. Dann geht’s mit dem Kneten los: Das Kraut massieren und kneten, sodass die Zellwände gebrochen werden und das Salz eindringen kann. Das dauert etwas und dabei sollte sich ganz schön viel Krautsaft am Boden der Schüssel ansammeln. Je frischer das Kraut, desto mehr Saft! Zum Schluss die Koriandersamen untermischen.
Die Einmachgläser und Deckel mit kochendem Wasser füllen. Kurz stehen lassen, dann das Wasser wegschütten (oder Pasta kochen). Immer eine Handvoll Kraut in die Gläser füllen und fest nach unten drücken, damit keine Luft zwischen den Gemüseschichten bleibt. Zwischendurch immer wieder ein Lorbeerblatt dazwischen legen und eine neue Schicht Kraut darauf pressen. Sehr gut hilft da auch ein kleiner Stößel (z.B. von einem Mörser).
Die Gläser nur zu 80% anfüllen, dann den Krautsaft darübergießen. Wenn das Gemüse nicht ganz bedeckt ist, vorsichtig das Salzwasser daraufschütten. Es sollten nach oben hin einige Zentimeter Platz bleiben, weil die Mischung beim Fermentieren aufsteigt. Fest verschließen und das Kraut ca. 2-3 Wochen bei Zimmertemperatur fermentieren lassen.
Am Anfang schaue ich täglich nach, ob das Gemüse mit Flüssigkeit bedeckt ist und öffne die Deckel alle paar Tage ein bisschen, um entstehende Gase entweichen zu lassen. Das ist wichtig, weil besonders normale Marmeladegläser sonst explodieren könnten! Bei der Gelegenheit bietet sich auch ein Geruchstest an: Es sollte immer angenehm sauer riechen.
Ich lasse mein Sauerkraut je nach Raumtemperatur für zwei Wochen fermentieren und lasse es dann für weitere zwei Wochen im Kühlschrank stehen. Anfänger kosten einfach mit sauberem Besteck und schauen, ob’s schmeckt!
Beim Entnehmen von Sauerkraut aus dem Glas immer alles sauber hinterlassen, das heißt kleine Stückchen, die am Rand kleben usw., wegwischen. Solange alles mit Flüssigkeit bedeckt ist und kein Schimmel entsteht, sollte alles in Ordnung sein. Selbst im Kühlschrank fermentiert das Gemüse langsam weiter. Wenn sich also der Geschmack der Fermente den Grenzen der Gaumengewohnheiten nähert, einfach schnell aufessen.
